
How to Upload Images in Canva App and Desktop
As content creators and business owners, one of the best ways to make your Canva design stand out is to upload your own images. Using your own images will make your designs and social media content stand out and look much better than using stock photos.
You can upload your own images in Canva, either using the desktop app or web browser, by clicking on the uploads section in the left-hand menu and clicking the upload button called “upload files”
You can also upload images to Canva from a mobile or tablet using the Canva app. Using the app gives you the added option of uploading from your Camera Roll.
If you have your images in cloud storage areas, you can connect your Canva account to online cloud storage services like Google Drive and Dropbox to easily add images to your designs.
Another way is to connect your social media accounts and add images to your design directly from your Instagram or Facebook accounts.

In this tutorial, I'll show you simple steps to upload files to use your own photos in your Canva project. I'll also include details on the image file types you can upload to Canva for your designs.
The process of uploading images and files is the same for a free Canva user and pro users, so just follow the method you prefer based on where your images are located. There isn't one main upload button, as items can be uploaded to Canva in various locations of the Canva website.
Upload Images from a Desktop to Canva
The simple process for uploading any accepted file type in Canva is using either a web browser or the Canva App. The two look very similar, but my go-to is the web browser, so let's first give you a step-by-step guide using the uploads tab or uploads panel. In my opinion, this is the easy way to upload in Canva.
Open Canva on your browser
Open a new design or any existing design
In the left-hand panel, click Uploads

Now you are in the Uploads panel, you have a few options you can choose from. Don't worry; whichever way you add your chosen file to Canva, it will automatically know to put it under images, video, or audio.
Drag and drop a file onto the files area
Click the Upload Files button and select the file location
Click on the three dots and select the platform you want to connect with
Once you have connected with the area where your files and images are located, it's as simple as just clicking the item to add it to your design. Once the image is in your design, you can edit it any way you want using the Edit Image options in Canva, including adding an outline to an image.
Key Point - Editing your image on your design doesn't affect the original image. The image will stay the same in both the original location and with an uploaded image in Canva. So, if you want to use the same image but edit it differently or use it in a different template in Canva at a later date, you can do so.
Upload Images from a Mobile or Tablet
You can upload images from your mobile or tablet using the same method as above, but we all carry our mobile phones around, and it's how most of us capture and take images and video. So, how do you get images and videos from your mobile phone into your Canva design?
Canva makes it easy to upload media from your phone to your Canva upload area.
Open Canva App on your mobile or tablet
Open a new design or any existing design
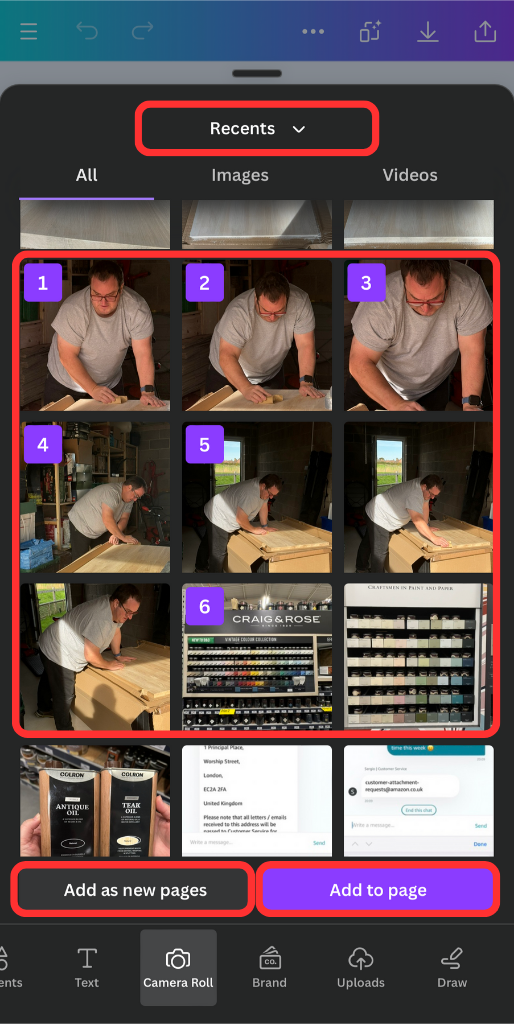
You will now see the Camera Roll icon on the bottom menu bar
Click here, and it will open the photos section on your mobile or tablet
Select one or multiple images or videos to be uploaded
You can then click Add as New Pages or Add to Page

This will add the images to the design you have open, but it will also add them to your uploads section in Canva.
If you have your images or video in folders, you can click Recents and select the relevant folder your image is in. If you are an iPhone user, you will know that Apple automatically has some smart folders like selfies, panoramas, etc., which you can select from in this menu.
How to Upload Multiple Images in Canva
If you are uploading images from the web browser or Canva App, you can upload a single image or file, or you can select and upload multiple items to be uploaded. To upload multiple items in the browser or App, hold down the Cmd key on a Mac or Alt key on Windows and select the files to be uploaded.
When you are happy with your selection, you can upload them by clicking open. This will add all the selected files to your upload area.
Quick Tip - Upload them in batches to avoid large waiting times or upload error issues
Looking for more ways to Speed Up Your Design process? Check out these Canva Keyboard Shortcuts
Finding Images and Files You Have Uploaded in Canva
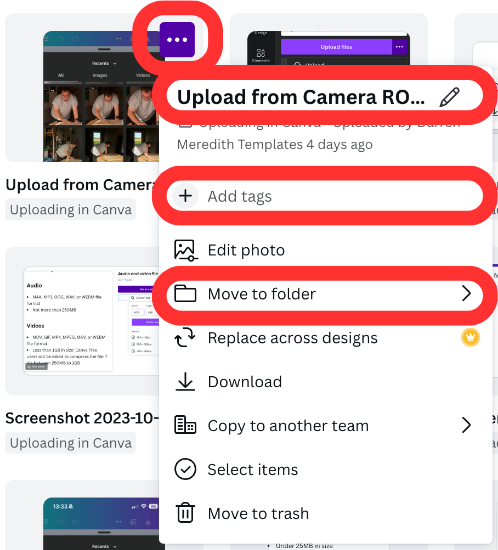
Name Your Files in Canva
Because it is hard to remember system-generated file names like oifcj9e9mc88NC8.jpg, it's best practice to name and organize your files regularly. I know this isn't always possible, but spending a few moments to name and file an image will help you in the long run.
The easiest way to organize your uploads is from the home page of the Canva website and navigate your way to the uploads folder. You can find this by clicking here https://www.canva.com/folder/uploads
If you have named your images to include keywords you want to use to describe them, you can use the search bar on the Canva home page to search for the images by name.
You can now add your images to any of the Canva Templates to give your social media posts a professional look.
Upload and Edit and Image Quickly in Canva
If you want to edit or crop an image in Canva quickly, you can do so from the Canva Website home page.

Click the Upload button
Drag and drop or select the image location
Select use in a new design (you can also add to a template)
Select Custom size, and the Canvas that is created will be the same as your image
Alternatively, you can select Edit Photo in the bottom left corner
You can now edit your image accordingly using Effects, Adjust Color or Crop the image

When you are done editing the image, click save, and you will be asked if you want to save to Canva or Download.
If you click download, your image will not be added to your upload area, so click Save to Canva.
Now you have saved the image to Canva. You can return to your uploads folder, locate the image, click the tree dots, and select download.
Canva Upload Error Issues
Now, if you get an error message when uploading, there are a few reasons why you might not be able to upload an image or file in Canva. These are the most common upload errors I have seen:
Check you have a working internet connection
The file is too large to be uploaded (normally happens with video files)
The type of file is not supported (also normally happens with video files)
You have run out of storage space on Canva
Types of File you Can Upload in Canva
Check your file type. Canva supports many file types, including:
Image files using JPEG, PNG, HEIC/HEIF, WebP and SVG.
Audio files using M4A, MP3, OGG, WAV or WEBM
Video Files using MOV, GIF, MPEG, MKV, or WEBM
You can also upload a psd file and PDFs and edit them in Canva. So if you are receiving an error uploading in Canva, make sure you check the file format.
Running out of file space on Canva is uncommon and one I've only heard about a few times. But the space limits are as follows:
Canva Free users - 5GB
Education and Nonprofit users - 100GB
Canva Pro & Canva Team users - 1TB
You can always contact Canva through the help section of the website.
Make sure you don't fall for Canva Pro Lifetime offers, as these are not something Canva offers.
If you stick to the most common types of files for images, video, and audio, you'll be ok. Canva is always evolving, but if you are in doubt, check the help section on Canva to see if your file type can be used in a design.