
Can Canva Schedule to Instagram?
The short answer is. Yes, you can schedule your social media posts to Instagram through the Canva Content Planner. You need to connect an Instagram Business account to schedule posts and use Canva's content planner tool, as well as a Canva Pro or Teams Account. Once your account is connected, you will be able to schedule your posts with a few simple clicks inside Canva. Scheduling posts is done from the Content Planner or when you select share from within a design window.
Getting Started Scheduling Content from Canva to Instagram
There are a few things to be aware of when you schedule content from Canva to Instagram.
You will need to use a Canva Pro Account (scheduling can't be done in the free version of Canva)
You can only schedule to your Instagram feed
You Can't schedule Reels, Carousels, or Instagram Stories
There are more options for scheduling to Instagram Story available in Meta Business Suite, but to use this, you will first need to download the designs you want to use from the Canva website and then upload and schedule using Meta Business Suite.
What Social Media Accounts Can You Schedule to Using Canva?
You can use Canva to schedule content for the following social media profiles:
Instagram Business Accounts
Facebook Page
Twitter (or is that now X?)
Facebook Groups
Pinterest Pin
LinkedIn Profile
LinkedIn Page
Slack
Tumblr
As you can see, the Canva content planner gives you quite a few ways you can share your social media content and Canva designs across various platforms to help build your engagement. Remember, if you have a free Canva account, the Canva scheduler is only available to Canva Pro users.
Why Scheduling Content to Instagram is Helpful
Part of any good social media strategy will involve some form of posting on a regular basis, but the problem with that is remembering to post every day when building a business can feel time-consuming. After all, as a small business, you are there to serve your customers on a daily basis. You're not full-time content creators and probably don't yet have the budget to employ a social media manager. But, you are aware that as a small business owner, it is important to have a social media presence. So, setting up a scheduled post from your phone or laptop in the evening is far easier.
Regular posting also means you are keeping the front and center of your customers when they are scrolling their social profiles.
Remember not always to be selling, and it's far more engaging to entertain and make potential customers or clients have some form of emotion. This way, they will feel more connected with you and your business.
In Canva, you can quickly select one of the many Canva templates, edit the template by adding your brand colors, and in a few clicks, schedule your chosen post to your social media channels. Remember to include a link to your latest blog post or sales information if it is relevant.
Why use Canva for Social Media Posts
Canva is a great online Graphic design software platform that gives you access to thousands of social media graphics and also has a robust content planner feature that makes it easy to go from a blank page to creating social posts in a few simple clicks.
Free to Use Templates

There is no need to design templates from scratch, as Canva has professionally designed templates that are easy to update. You can update them from the Canva website or your mobile device using the Canva App for business owners who are on the go.
Easy Resize for Multiple Social Media Platforms
Once you have your chosen design, you can click resize and change or copy your design over to a new size for another social media platform. This means you can not only post to Instagram but many other platforms using the same design (see above).
The resize feature in Canva makes it the perfect tool for busy business owners who want to create stunning graphics across multiple social networks but are not quite ready or don't have the budget to employ a social media manager.
When you do decide the time is right to hire a social media manager, you can invite them and up to 4 additional people as team members to your account.
How to Schedule an Instagram Post Using Canva
Once you are ready, there are two main ways that you can schedule your new design.
Use the Content Planner from the Canva home page
Share and schedule your design from the design space
In each of the following, I'll show you how to schedule Instagram Posts. However, the same principle applies to other social media networks.
Schedule to Instagram From Canva Home Page
Finding the content planner on the home page has changed a few times, but typically it will be in the left-hand menu of items. Currently, this is under the "Apps" menu on the left-hand side of the home page. If you do not see this, click the burger menu in the top left corner to show the side menu on the Canva home page.
Click Apps, and you will see a sub-menu open up

Clicking on Content Planner gives you a few options, including Learn and Play and a calendar view of events.

Even if this is your first time seeing the content planner, you will notice that there are some events showing on the content calendar view.
These are suggested events inside Canva, and clicking on them will give you a small selection of templates around the holiday or event happening on that date.
These suggestions are helpful when you are not quite sure what to post. However, if you are looking for more ideas, I have 365 days of social media post ideas just for you. Check it out here
As you hover over the date you want to create your post, you will see a + sign. Click on this, and you will be presented with a pop-up window to create your scheduled post.

From here, you can select a recent design (scroll to see up to 20 of our most recent designs). You can also click on the "Your Projects” Folder to select a design from a different area or folder where you have the design filed.
If you haven't created your chosen design, Canva will suggest some of the latest trending templates and different designs you can use or click create a design.
Selecting a Template or Create a Design
When you click a new template or create a design, it will open up the design window, and you will then schedule your design using option two below.
Option two allows you to schedule your post to Instagram from within the design space of Canva. This is my preferred option, as you can easily select from tons of templates and edit them within the Canva editor before scheduling the design for your chosen social platform.
Selecting When to Post to Instagram
The right-hand section of this screen is for scheduling an Instagram post in Canva. Selecting the specific date and time you want your post to be published, selecting which social media platform or channel to send your post to, and also a space for your caption and hashtags.

Click on the date or the three little dots to the right to change the date and a specific time you want your post to be published. As with all social media posts, this is displayed in UTC (which is your local time zone or Universal Time Zone). The system will know which timezone you are in and post it at that time.
If you want to post to a different time zone time, you will need to work that out according to the timezone set in your Canva settings.
Once you have set the date and time of your post, you will select the channel. If this is your first time using this feature, you will need to connect your Instagram Business Account and other social media platforms to Canva. Simply click Connect and follow the on-screen instructions.

Once your Instagram account is connected, you will be able to select the connected account from the drop-down menu.
One thing to note is that you can only connect your account to one Canva Profile and vice versa. If you are working with multiple clients or Instagram accounts, you must disconnect them each time.
The better option is to have your client add you to their Canva team. This way, they are in control of the account connections.
Writing a Compelling Instagram Caption
Once you have selected the date and time of your post, you will need to write your engaging Instagram post caption.
As with creating any Instagram post, you will have up to 2200 characters for this, which will include any space needed for hashtags.
It would be nice if hashtags were suggested, but currently, they are not suggested. But you can paste include hashtags in the description, and when your post is published, they will be displayed as clickable searchable hashtags.
Using Canva For Instagram Caption Writing
In the moments where you have writers block and just can’t think of what to write, I've found using Canva Magic Write useful. It’s helpful for those moments when you need some extra inspiration or to reword what you have into something that is aimed more toward your target audience.
Once you are happy, you can press the Schedule button, and your design will auto-post to your Instagram or chosen platform at the scheduled time. Or if you are not quite ready, you can click save to draft, and you can come back later to do any final edits to the design or caption and select schedule then.
Now you have scheduled your first design for your Instagram using Canva; there is no stopping you. Spend some time to schedule at least one post a day to help build your reach and engagement with your audience.
Schedule to Instagram From the Design Page
Selecting to schedule a design once you have created it in the design space is the best way to schedule a social media post to Instagram using Canva. For me, it is also the workflow that makes the most sense and, therefore, is the one I use, and, as a small business owner, it saves the most time.
Creating your Design
From the Canva home page, select Social Media just below the search bar. This then shows a sub-menu of Popular, Instagram, Facebook and LinkedIn. For this example, we are going to continue with Instagram.

Click on Instagram and then in the post types sub, sub menu, we will be selecting Instagram Square for this example.

You will now be presented with your blank Instagram post in the design space. From here, you can search from one of the many pre-made templates that are available to Canva users to edit and update with your own brand colors, images, and text using the design tools and design elements.

Using these templates is a great way to save you a lot of time, especially when deciding the layout of a design. There is such a wide range of templates that the hardest decision is finding the right one. If you type in @bettercontentcreators to the template search bar, you will be shown my templates on Canva that are available for you to use at no additional cost.
*Top tip*
Once you have designed your template, select file and save to folder and select a place in your folders that helps you find this for the future (should you need it or want to do any edits and updates).
It is also good practice to give your design a name, giving you more of a chance of finding it in the future.
Schedule Your Design to Instagram
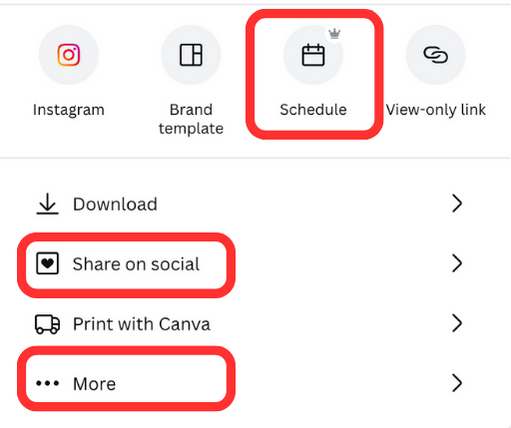
You will now select the share button in the top right-hand corner of the screen (formally known as the download button).
Select Share on Social from the drop-down menu that comes up, or you can also select Schedule. If you don't see this, you can select more, and you should then see it from the further options.
Selecting Schedule will take you through a series of menus.
The first menu is to select the future date and best time you want to schedule your post for.

Once selected, press next.
The next menu also allows you to also edit the date and time either by selecting the date or the three little dots to the right. But also asks you to select the channel you want to schedule to. If this is your first time, you must connect your account first.
Select and/or connect from the various social media platforms you want to post to be scheduled to. As this is Instagram content, we will select Instagram. If you have multiple Instagram accounts connected to your Facebook/meta business profile, you can switch between them here. But they must be on the same Meta/Facebook Account.
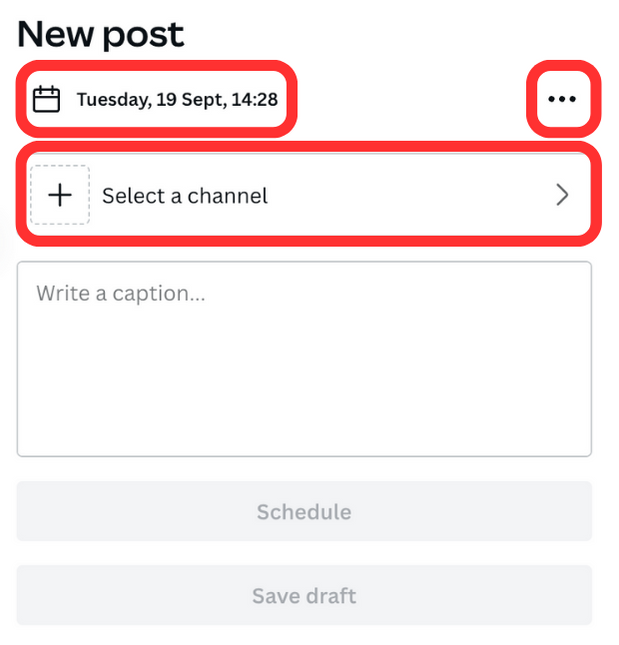
Write in your captivating caption up to 2200 characters long and press schedule or save as draft.
Whichever of these you select, you can edit them before they are scheduled to be posted to Instagram via the content planner. You can find the content planner on the Canva home page under the Apps section.
Editing a Scheduled Instagram Post in Canva
Once you have scheduled your Instagram post using Canva, but want or need to to edit the post, you can do so by accessing the content planner from the home page under the apps section.
Select the post you want to edit and carry out the required changed.
What Can You Edit on a Scheduled Post?
You can change the following on a scheduled post:
Date of post
Time of Post
Caption (including hashtags)
If you need to change anything on the design, you will need to go back into the design, make the required changes, and reschedule the post again.
You can click on the three dots and edit the design, but you will need to reschedule.

Just check and make sure you keep a copy of any captions you have created before you delete the post. As this can often be the area you spend the most time.
I like to keep a document with captions in, just in case I want to create something around the same area in the future.
How to Delete a Scheduled Instagram Post in Canva

To delete a scheduled Instagram Post on the Canva Content Planner, you will need to access the content planner from the home page (see above).
Select the post you want to delete.
Click on the three dots next to the date, and from the drop-down menu, select delete post.
Again, make sure you copy any caption text you want to keep before you delete your scheduled post.