
How to Easy Add an Outline in Canva to Images and Text
This Canva tutorial will give you a step-by-step guide on adding the outline effect to an image and adding an outline to text in a few simple steps.
I’ll also show you how to. Remove the Background of an Image and add a Styled Border to any Image in Canva, including shapes and elements.
Why Add an Outline to an Image?
Adding an outline to an image or text is often used in social media posts and a YouTube thumbnail to make a product, person, or font stand out and make the image pop.
If you want to create more engaging thumbnails and get more clicks on your YouTube videos by giving your YouTube Thumbnails a professional look, check out my blog post on Making YouTube Thumbnails in Canva.

Why Use Canva?
If you are new to Canva, Canva is an online graphic design platform that makes adding an outline to any image or text inside any design easy.
Canva is a popular graphic design tool with thousands of professionally designed templates you can use and edit. Canva Pro users can also access additional tools and templates that make designing and creating social media posts much easier.
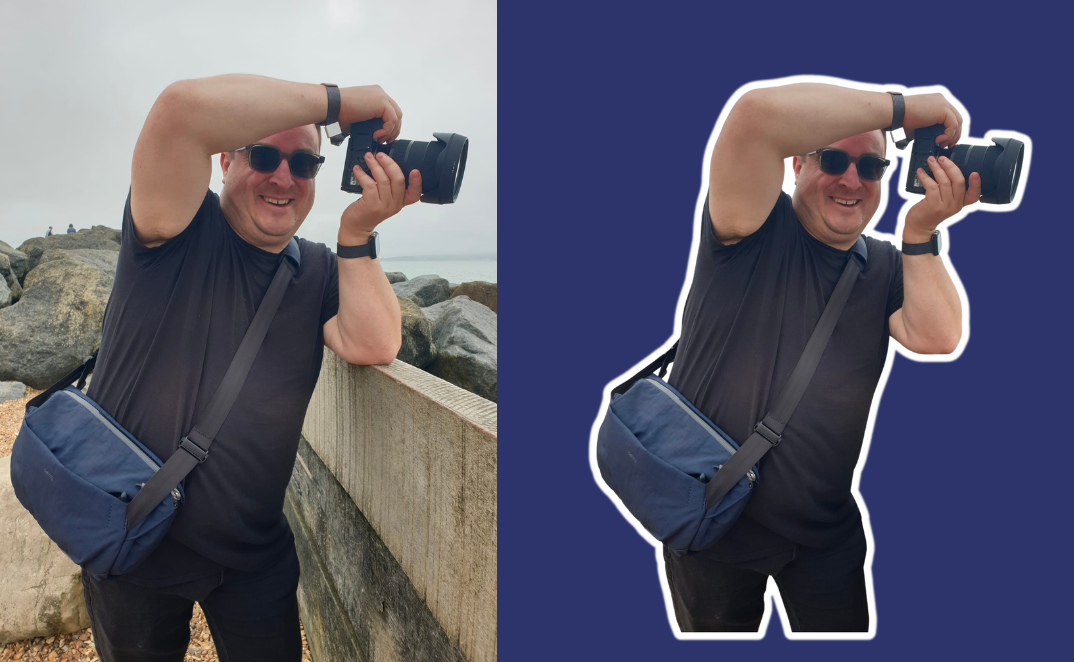
Adding an outline is a great way to make the subject of a photograph or text stand out. This is normally with a white outline. However, in Canva, you can use any other color you want the outline to be, as you can change the color of the outline to any color you want it to be.
Let's get into it.
Simple Steps to Adding the Outline Effect to an Image in Canva
Signing up for a Canva Account
The first step is to log on to your Canva account. If you are not already a Canva user and don't have a Canva account, you can sign up for the free version of Canva.
If you need to remove the background of your image using Canva's background remover tool, you will need a Canva Pro account. Otherwise, the outline will apply to the whole image, not just the cutout.
Adding an Outline to Image in Canva
Login and open Canva and open your design or start a new one using the dimensions you want or select from one of the many thousands of templates inside Canva.
On a blank page or in your Canva design add the image you want to create the outline on. If you drag and drop the image onto your design, the image will automatically be added to your uploads section. This is handy should you want to use the same image in a design in the future.
You can also use one of the many stock photos in Canva, but it's always better to use one of your own images, as this will give you a more unique look. I can normally spot a stock image from a mile away, and with 135 million active Canva users, stock images are used quite a lot, and it is best to be unique.
Remove the background of the image
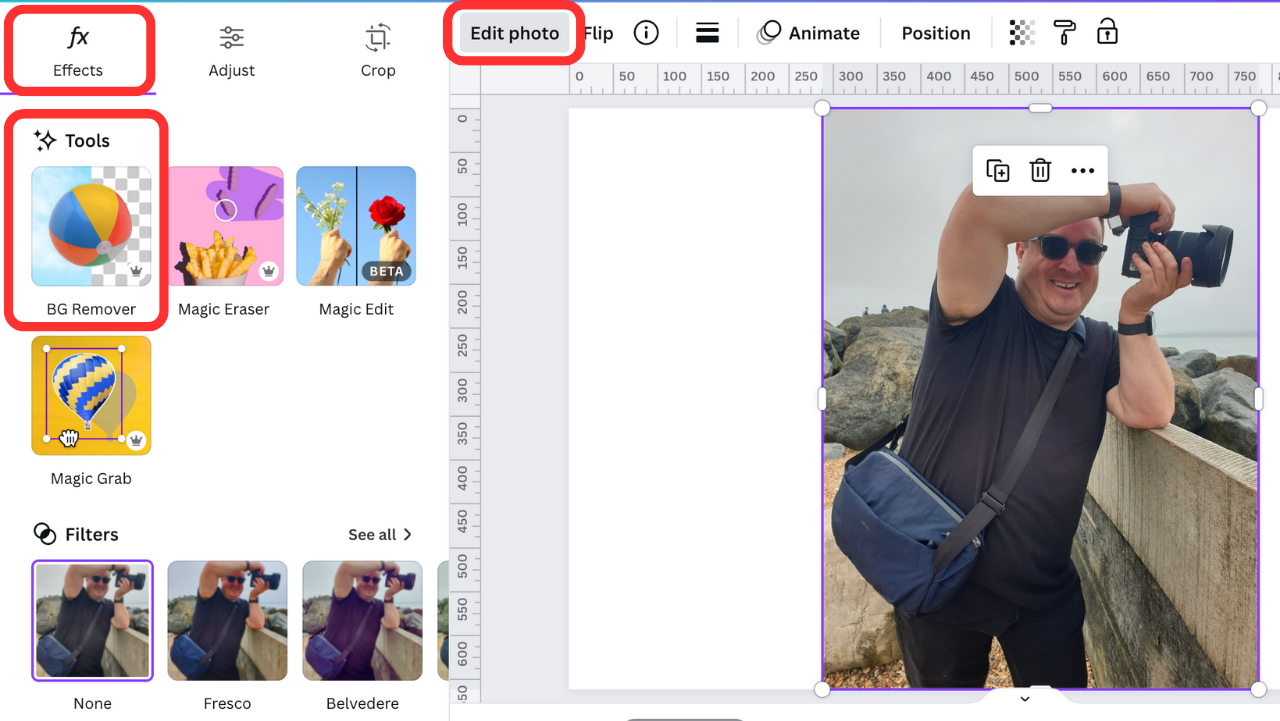
Select the image > Edit Photo > Under tools, select BG Remover, and Canva will work its magic and remove the background of your image.
You can opt to tweak the Background removal result if it hasn’t removed enough or there are spots you need to restore.
Click on the BG Remove Icon, and you will be given the option to paint in and restore or erase further areas of the image. If you need to, you can get very detailed here.
Change the size of the bush to something down to 1 pixel, and just to help you, you can also select to show the original image as a guide so you can see what areas have been removed.

Tip for better results
The better the quality of your image, the better the result will normally be. A poor quality image will mean the background removal tool will find it harder to decide what is the background and what the image is.
Now for the Easy Way and Best Way to Add an Outline to Your Image
To use Canva's built-in outline tool. Select your image > Edit image scroll to > Fx Effects and select > Shadows

The shadows menu will allow you to select from the three presets - Glow, Drop, or Outline.
Technically, it doesn't matter which of these you choose, as these are just different presets of styles of shadows you might want to apply to your image.

Outline Shadow Settings
For example, click on glow, and you can then change and adjust the following:
Change the size of the outline (thickness of the outline)
Blur amount
The angle of the shadow
Distance of the outline
Select the color
Intensity (think of this like fade)
To get your hard outline, change each of these settings, as you need.
My Favourite Settings
Here is what I use for the perfect outline each time.
If you want a hard outline set them as follows:
Size = 16-35
Blur = 0
Angle = 0
Distance = 0
Intensity = 50-100
I like adding a little blur, as a hard outline can look amateur.
And you're done. You just need to export your design using the share button in the top right corner of Canva.
Exporting your Image with a Transparent Background in Canva
Once you are happy with your design, it's time to hit that download button (Canva calls this export). If you only want to export the cutout and not have a white background, you must export your image file type as a PNG and select the Transparent Background option from the share menu.
Exporting with a transparent background is a Canva Pro feature.
How to Easy Add Outline Text in Canva
Adding a shadow or outline to text in Canva is as simple as selecting the right text effect for your original text. Let me show you the easiest way to add an outline to your chosen font.
Add or select any text box to your design in Canva. You can do this by choosing text in the menu on the left side of the screen or by pressing T on the keyboard. This is just one of many Keyboard Shortcuts you can use in Canva.
Select the text box on your design and select Effects on the top toolbar menu. This is where you can access the text effects panel and add other effects to your text.
These text effect options in Canva will save you so much time. The main ones you will want to use to add any kind of outline will be Hollow, Splice, Outline, Glitch, Neon (glow effect), or Background.

You can now curve your text as an added effect on top of the other text effects you use, or if you want to simply curve your text in Canva.
Which Text Effect to Use for an Outline?
Each text effect will give you a different look and feel, but select the outline text effect for the best results of an outline on text in Canva.
The Splice effect will give you a version of an outline text, but it is not the cleanest-looking result, so it will depend on the look you want to achieve in your design. See the examples below of each of these effects.

If you want just an outline of a font, you can select the Hollow Effect, and this will show whatever is behind the image.
Changing the Text and Outline Color
As with any text in Canva, you can change the text color using the menu. You can also use the built-in Color picker to select a color from an image in your design. Selecting a color from an image in your design is a great way to make text in a design look more professional.
You can change both the color of the text and the outline color. To do this, select the text effects panel and click either the color swatch on the top menu bar or the color swatch inside of the effects panel.
One will change the outline color, and the other will change the font color. Annoyingly, this is not the same way for each text effect, so you'll have to check on the one you are using.
More Text Effects in Canva
Other text effects you can use include drop shadow to give you a shadow effect. If you are looking for a Glow Option, use Neon and adjust for the right Glow Effect
Lift will help make your text stand out from the background image or color you have on your design.
Adding a Styled Border to an Image in Canva
Use a different menu to add an outline to an image without cutting it out. Select your image in your design and use Border Style on the top menu.
This is a quick and simple add-an-image border. In this menu, you can change the border style from a dashed line to a dots outline, change the weight of the border color, and even round off the image's corners.

So, if you simply want a colored outline, you no longer need to add a white rectangle behind the image and try to line it up.
You can use this same menu to outline any of the element shapes from a solid color to one with a border.
Adding an Outline to an Element in Canva
You may notice a slight difference if you have tried to add an outline to an element for a sticker-type effect. The first difference is that the menu is called Edit Image, not Edit Photo. If you want to add an outline to an element in Canva, you will first need to export the image with a transparent background (as a PNG file) and then re-import the element as a photo.
Once you import the element as a photo, you can create an outline using the step-by-step guide above.